Chapter 2 - Getting started with PrintfilThe fastest way to try Printfil is by using the guided configuration to setup the basic parameters, needed to capture the print jobs created externally. If this is the first time you run Printfil on this machine, the guided configuration will be started automatically, otherwise you can start it manually, by right clicking the Printfil's trayed icon (in the bottom right corner, near the Windows clock) and choosing Configuration -> Guided After answering the questions shown on screen, the guided configuration will automatically run the Test function. This function creates some testing pages which will be shown on the preview window (if enabled), so that you can print them on your own printer by clicking the "Print" icon. At this point, if the configuration has been made correctly, you can print directly from your source program obtaining the same result. Now you only have to open the standard configuration dialog by choosing Configuration -> Standard in the Printfil's menu to setup the last details: preview, page margins, text color etc. If then you want also to manually test some Printfil details, then follow the steps below. They probably makes sense only to advanced users and programmers. Let's start: Right click the Printfil's trayed icon and choose Configuration -> Standard, then check which file name is inserted in the "File to check" field. Let's say it's c:\program files\printfil\filename.txt Now open the "Command Prompt" or "MS-DOS Prompt" and navigate to the directory corresponding to that file. In our example: CD "C:\PROGRAM FILES\PRINTFIL" Tip: If the "File to check" field starts with [e:HOMEPATH] or [e:TEMP], then the right path is the user's home or temporary directory (for example c:\Documents and Settings\Administrator or c:\Documents and Settings\Administrator\Temp). In this case probably the Command Prompt is already positioned in the right directory, otherwise please type CD %HOMEPATH% or CD %TEMP% Now type: DIR > FILENAME.TXT
Now close the preview and type: DIR /B > FILENAME.TXT
Now we can create the optional configuration file. Type: NOTEPAD FILENAME.CFG Type (or cut & paste) the following 3 lines into the empty file: My
First Print Job Make sure you press ENTER after the 3rd line, then save the file and run the DIR /B > FILENAME.TXT command again.
Now we can add another two rows to the configuration file, thus: My
First Print Job with background then run the DIR /B > FILENAME.TXT command again.
Tip: If the bitmap is not merged, then Printfil is not installed in that directory. In this case please insert the correct path in the 4th row or make it pointing to another bitmap on your disk, Now change the 4th row to read as follows: c:\program files\printfil\backgr.bmp|2|3|7|-1 and again run the DIR /B > FILENAME.TXT command.
You can repeat the print jobs run so far even by right clicking the Printfil's trayed icon and choosing the desired job by the "Redo Last Print" menu option. Now
choose Configuration -> Standard from the PRINTFIL
menu. Click OK to apply your changes and select "Redo Last Print" from the PRINTFIL menu.
Please reselect the GDI printing engine in place of RAW now, otherwise all the subsequent jobs may not be printed correctly in the following tests. Testing the LPT capturing option is relatively easy. In Configuration -> Standard
Tip: If
you're running Windows 95/98/ME, Mode 0 is not available. In this case
you'll have to complete some additional configurations, as described in
Chapter 7
Once Printfil is configured for capturing a parallel port you can simply: DIR > LPT1: (or any other port you've selected in the configuration dialog)
DIR > PRN:

|
|||||
26 Nov 2025
|
|||||
Printfil Manual - Getting Started
Windows Printing System For Applications
 How to print from DOS PRN, LPT1: to Windows printers: USB, Wi-Fi, PDF
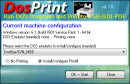 Run DOS programs on Windows 64-bit through DOSBox / vDos and print to USB, GDI, PDF printers through Printfil